


How to Make a Sink with a Tree Log | Step-by-Step DIY Guide
How to Build a Unique Tree-Log Sink for Your Bathroom
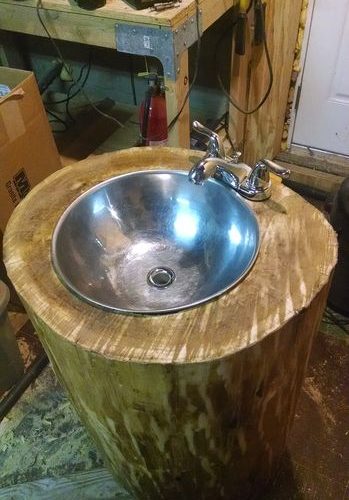
Creating a sink carved into a natural tree log is an eye-catching DIY project that blends craftsmanship, rustic design and sustainability. Although the result is stunning, the process requires patience, precision and the right tools. If you want to explore similar woodworking ideas, visit the woodworking section on Vilssa.

🪵 Materials and Initial Preparation
- 🌳 Select a suitable log.
Choose a thick, stable tree log with enough diameter to hold the sink. Make sure it is dry and free from structural cracks. - 🔧 Remove the bark and clean the surface.
Use chisels, a scraper or a wire brush to clean the entire exterior of the log. - 🕳️ Create a lateral opening for plumbing.
Cut an access hole wide enough to insert the drainpipe and water supply lines comfortably.
🪚 Hollowing Out the Log and Fitting the Sink
- 🛠️ Mark the sink outline and drill multiple holes.
Create a grid of perforations to simplify the hollowing process. - 🔨 Carve the interior using hand tools.
Remove the wood gradually with chisels and special woodworking tools. This step requires patience and precision. - 🧩 Test the sink fit repeatedly.
Insert the sink several times during the process to ensure a tight and stable fit.
🧴 Finishing and Protecting the Wood
- 🪄 Apply wax or protective varnish.
Treat the entire surface of the log to protect the wood from moisture. Natural wax enhances the texture and grain. - 🚰 Complete the plumbing installation.
Once the sink fits perfectly, connect the drain and water pipes, ensuring no metal parts rub directly against the wood.
✨ Optional Upgrade: Add LED Backlighting
To elevate your project even further, you can install a small LED lighting system behind the log or at its base. This highlights the wood texture and creates a warm, cozy ambience, perfect for rustic or contemporary bathrooms. Browse more DIY ideas in the Vilssa DIY section.
📋 Summary Table
| Step | Action | Goal |
|---|---|---|
| 1. Preparation | Choose and clean the log | Create a stable base |
| 2. Plumbing access | Cut a lateral opening | Allow pipe installation |
| 3. Hollowing | Remove wood and test fit | Fit the sink inside the log |
| 4. Finishing | Apply wax/varnish | Protect wood and improve aesthetics |
Find more inspiration using the Vilssa search tool:
https://vilssa.com/es/?s=lavabo
Written by the Vilssa woodworking & DIY editorial team.
Publicaciones relacionadas:
 How to Make Plaster Masks Step by Step – Easy DIY Craft for Kids
 How to Measure on a Floor Plan: A Practical Step-by-Step Guide
 How to make plaster figures step by step: easy and creative guide
 How to grow potatoes at home step by step: practical and easy guide
 How to repair a parquet floor: practical step-by-step guide
(de translation)
How to repair a parquet floor: practical step-by-step guide
How to repair a parquet floor: practical step-by-step guide(de translation)