


How to Make Christmas Ornaments with Cardstock Strips
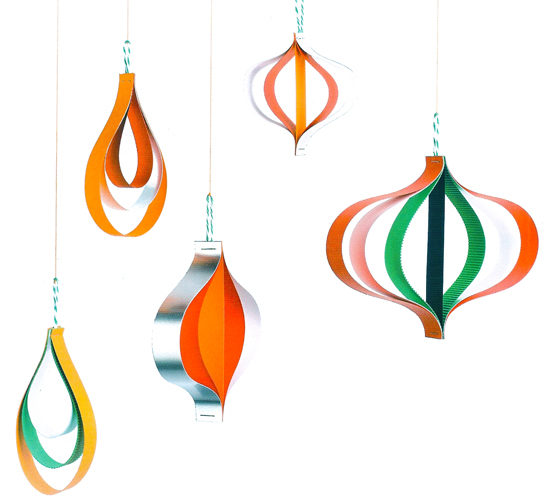
How to Make Christmas Tree Ornaments Using Strips of Cardstock

- 🎄 Gather the basic materials. You will need cardstock in various colors, a stapler, and a string to hang the ornaments. For more handmade Christmas ideas, you can check out projects like these pastry-paper Christmas trees.
- 📏 Cut the cardstock strips according to the design you want. Cardstock is perfect for crafts due to its rigidity and flexibility. You can learn more about it at Wikipedia – Cartulina.
- ✨ Type 1: small ornament with five strips. Cut strips 2 cm wide with the following lengths: two of 15 cm, two of 10 cm, and one of 8 cm. Arrange them from longest to shortest (outer to inner). Attach the string at one end and staple all the strips together. Then align the bottom ends and staple again.
- 🎨 Type 2: medium ornament with more volume. Use the same 2-cm width, but this time cut strips of 21 cm, 27 cm, and 32 cm. Assemble the ornament in the same way: organize them by length, staple both ends, and shape the sphere.
- 🪄 Type 3: large ornament for the lower part of the tree. Cut strips 2.5 cm wide: two of 27 cm, two of 23 cm, two of 18 cm, and one central strip of 15 cm. Put them together following the same method as the previous types. This larger size works best near the bottom of the tree.
- 🌲 Place each ornament according to its size. Larger ornaments should go near the bottom of the tree, while smaller ones look best toward the top. For more creative inspiration, explore this plastic-mesh Christmas tree or browse the Vilssa Christmas search tool.
- ✨ Experiment with colors, shapes, and finishes. Use metallic cardstock, classic holiday tones, or color combinations. You can create matching ornament sets for a more coordinated look.
Difficulty: easy
Estimated time: 1 hour
Publicaciones relacionadas:
 How to Make Christmas Reindeer with Toilet Paper Rolls Step by Step
 How to Make Christmas Yarn Stars Step by Step
 How to Make a Christmas Wreath with Clothespins Step by Step
 How to Decorate Glass Jars with a Snow Effect for Christmas
 Simple and Original Ideas to Decorate Your Home for Christmas
 How to Customize Your Christmas Lights with Ping-Pong Balls